REBOL BBS Tutorial - A CGI Web Bulletin Board
Revised: 12-Mar-2024
How to build a simple web-based bulletin board (message board) as a REBOL CGI program.
Contents
RBBS Feature Summary
What's Not Included
Related Tutorial Articles
How to Try It Out
License Statement
Overall Design
Configuration
HTML Templates
Main HTML Template
HTML Data Entry Form
Support Functions and Initialization
Test Mode
Setting Binary Number Base
HTML Output Buffer
The HREF Hyperlink Function
Encoding HTML
Formatting the Date
Reading CGI Input
HTML Body Content Extractor
Web Page Output
Error Output
Removing Unwanted HTML Tags
Web Form Output
Topic (Thread) Functions
Generating a Topic Id Number
Loading and Saving Topics
Adding a New Topic
Searching For Topic in the Database
Updating the Topic Database
Linking to a Topic
Building the Topic Summary Page
Message Functions
Loading and Saving Messages
Adding a New Message
Purging Old Messages
Hiding Email Addresses
Generating a Message Listing
Building the Message Output Page
The Main Program
Read the CGI Request
Filter HTML Tags
Convert CGI Fields
Process the CGI Command
Conclusion
Introduction
The main purpose of this tutorial is to give you a better idea of how to write more substantial types of programs using REBOL. Many of the programming methods and patterns that are described in this tutorial are helpful for writing other types of programs in REBOL. For example, the method we use for HTML templates and Web forms is commonly used in most REBOL CGI programs. This is also true of the general way that CGI is handled as well as the way data is stored in REBOL data files. We will also describe handy techniques for managing small data sets, convenient ways to specify the program configuration, and how to test the program by running it locally with REBOL, rather than uploading it each time.
RBBS Feature Summary
Here is a list of the main features provided by this BBS tutorial:
- Implements an open, web-based bulletin board system
- Runs as a normal CGI script using REBOL/Core 2.5.6.
- Summary page shows current message topics (threads) and related information
- Message pages show recent messages for a given topic
- New message topics are created from a web form
- New messages are added to a topic from a web form
- Stores messages by topic on disk
- Auto-deletes (purges) older messages
- Uses easy-to-edit HTML template files and forms
- Easy to customize and configure
What's Not Included
We don't want this tutorial to get too large, so we decided not to include certain features at this time. Some of them may be added as part of a future CGI tutorial.
- User accounts (including user registration)
- Browser cookies
- Fancy message formatting
- Message searching
- File locking methods
Related Tutorial Articles
If you haven't read Quick and Easy CGI - A Beginner's Tutorial and Guide and Creating and Processing Web Forms with CGI, we suggest that you may want to read those first; at least skim them. Some of the functions used here are described in detail in those articles.
How to Try It Out
Of course, the whole point to this tutorial is to give you a good starting point and a good understanding of how to create your own bulletin board system in REBOL. So, you will no doubt want to try it out.
If you want to see generally what it looks like, you can try out a test version of the BBS on the REBOL.net web site:
To get source code and install it on your own web server, follow these steps.
- Download the RBBS source code
you can get it from our RBBS Test Site or from REBOL.org. - Download a recent version of REBOL/Core and transfer it to the CGI directory of your web server.
- Follow the instructions in Quick and Easy CGI*
A Beginner's Tutorial and Guide for how to set up REBOL for CGI scripting. Unless you have an unusual web server configuration they should only take a few minutes. - Test out the BBS using a Web browser to go to the correct location on your web server.
License Statement
You are free to use and redistribute this software for any legal purposes, as long as you include the copyright, author credits, and the notice below. This is a BSD license.
This software is provided by the copyright holders and contributors "as is" and any express or implied warranties, including, but not limited to, the implied warranties of merchantability and fitness for a particular purpose are disclaimed. In no event shall the copyright owner or contributors be liable for any direct, indirect, incidental, special, exemplary, or consequential damages (including, but not limited to, procurement of substitute goods or services; loss of use, data, or profits; or business interruption) however caused and on any theory of liability, whether in contract, strict liability, or tort (including negligence or otherwise) arising in any way out of the use of this software, even if advised of the possibility of such damage.
Overall Design
Before we begin describing the details of the RBBS program, it would be good to give you an overview of its design.
The diagram below illustrates the main components of the design:
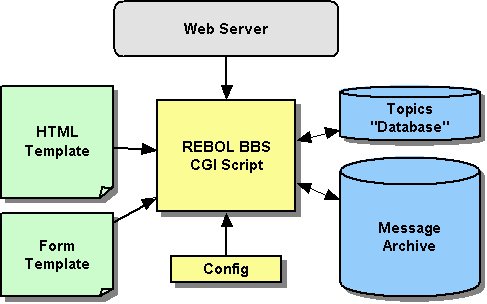
Description of diagram:
- The HTML Template file on the left is used to give the RBBS program its general web appearance and provides style sheets.
- The Form Template file on the left provides the Web form for entering new messages. The advantage of keeping these as separate files is that they can be edited using any HTML page editing tool.
- The RBBS Script in the center is a CGI script that is run by your web server when a specific URL is provided.
- The Config file is a small configuration file that you can use to customize your copy of RBBS. It also allows you to run more than one copy of RBBS on the same server.
- The Topic "Database" on the right stores the actual message topics (threads).
- The Message Archive" is a collection of files (one for each topic) that holds the actual BBS messages.
These last two items are REBOL data files created by the RBBS program itself. If you examine any of these files you will notice that they are in REBOL format. We will describe the structure of these files in the sections below.
Configuration
We want to keep the configuration simple and easy to set up. To that end, there is a configuration file (so you don't have to mess with any code to fit it into your server environment) with default settings that should work "out of the box" for most people.
The configuration file also lets you easily run more than one copy of RBBS from the same server. You can run as many bulletin boards as you want.
The configuration settings live in a "context" of their own. In this case the context is an object, which gives us an easy way to refer to things in the configuration namespace.
The configuration file is actually a REBOL script that will be executed, so you can include other code as well (if necessary). For example, below the config object you will see some code that creates the message directory if it doesn't already exist.
config: context [

    title: "Simple REBOL Message Board"
    cgi-path: %/cgi-bin/rbbs.r

    base-dir:  %rbbs/
    topic-id: join base-dir %id.r
    topic-db: join base-dir %topics.db
    msg-dir:  join base-dir %messages/

    html-template: join base-dir %template.html
    html-form: join base-dir %form.html

    max-days: 60  ; delete msgs older than this if...
    max-msgs: 100 ; max messages is reached.

    msg-order: none ; or 'new-first for reverse order

    tags-allowed: [<b> <i> <p> <br> <pre> <blockquote> <a> <font>]

]

if not exists? config/msg-dir [make-dir config/msg-dir]
Here is a summary of the configuration fields listed above:
| Field | Datatype | Description |
|---|---|---|
| title | string! | The text that will display as a header for the message board. |
| cgi-path | file! | The URL path on your web server to the message board script. |
| base-dir | file! | The file path to the topic-id, topic-db and msg-dir files relative to the cgi-path above. |
| topic-id | file! | The name of the message topic (thread) ID counter file. |
| topic-db | file! | The nane of the message topic database file (just a list really). |
| msg-dir | file! | The name of the directory where messages will be stored, relative to the base-dir. |
| html-template | file! | The filename of the main HTML template used to create the look of all pages. Includes HTML styles definitions too. You can edit this file in an HTML editor (or text editor) to get the exact look you want. |
| html-form | file! | The filename of the HTML form used for data entry of messages. This file can be modified to make the form look the way you want. |
| max-days | integer! | The number of "days old" a message can be before it is removed (purged) from the system. |
| max-msgs | integer! | The "purge trigger". When the number of messages in a topic reaches this limit, old messages (those older than max-days) will be purged from the topic. |
| msg-order | word! or none! | In what order the messages should be displayed. Use none for chronological order or new-first for reverse chronological order. |
| tags-allowed | block! | This is a block of tags that are allowed in messages. Any other tags will be stripped out as a security measure. |
Under the msg-dir a file will be created for each topic, with the name of the file being the topic-id (an integer):
messages/       ; msg-dir from config
    1           ; messages for topic 1
    2           ; messages for topic 2
    (etc.)
HTML Templates
The HTML templates are very simple in this example, but you can create your own to match the look of your site. The important elements in the HTML are a few special words that are replaced by content that fills out the template when the CGI script is run.
Here are the keywords that are replaced in the template:
$date
$content
$title
$version
If those words conflict with other elements in your page, you can modify the code to use other tags. The show-page function is the only place these tags are used so changing them is easy.
Main HTML Template
Here is the HTML template used to create all pages of the BBS. Modify it as you want. You can even use a web page editing program as long as you keep the keywords within the template.
<!-- Page generated by REBOL -->
<html>
<head>
<title>$title</title>
<meta http-equiv="content-type" content="text/html;CHARSET=iso-8859-1">
<meta http-equiv="pragma" content="no-cache">
<meta http-equiv="expires" content="-1">
<title>$title</title>
<style type="text/css">
body, p, td {font-family: arial, sans-serif, helvetica; font-size: 10pt;}
h1 {font-size: 14pt;}
h2 {font-size: 12pt; color: #2030a0; width: 100%;
    border-bottom: 1px solid #c09060;}
h3 {font-size: 10pt; color: #2030a0;}
tt {font-family: "courier new", monospace, courier; font-size: 9pt;}
pre {font: bold 10pt "courier new", monospace, console;
    background-color: #e0e0e0; padding: 16px; border: solid #a0a0a0 1px;}
.title {Font-Size: 16 pt; Font-Weight: bold;}
</style>
</head>
<body bgcolor="white">
<center>
<table width="660" cellpadding="4" cellspacing="0" border="0">
<tr>
<td><a href="http://www.rebol.net"><img
src="http://www.rebol.net/graphics/reb-bare.jpg"
border=0 alt="REBOL"></a></td>
</tr>
<tr height="10"><td></td></tr>
<tr><td>
<h1>$title</h1>
<p>$content<p>
</td></tr>
<tr><td><img src="http://www.rebol.net/graphics/reb-tail.jpg"
border=0></td></tr>
<tr>
<td><p align=center><font color="#808080">
Message Board Tutorial $version
<a href="http://www.rebol.net/cgi-bin/rbbs.r?cmd=source"
>[Source]</a> - </font>
<a href="https://www.rebol.com"><font color="#808080">REBOL.COM</font></a>
</p></td>
</tr>
</table>
</center>
</body>
</html>
HTML Data Entry Form
The form used to enter new messages is very simple and doesn't contain any replaceable tags. It's a well-formed HTML file so you can edit it with any web page editor. But, we'll only be using the body as a component in other pages.
<html> <body> <table border="0" cellpadding="2" cellspacing="1" width="100%"> <tr> <td width="87"> <p align="right"><b>Subject:</b> </td> <td><input type="text" name="subject" size="46"></td> </tr> <tr> <td width="87"> <p align="right"><b>Name:</b> </td> <td><input type="text" name="name" size="46"></td> </tr> <tr> <td width="87"> <p align="right"><b>Email:</b> </td> <td><input type="text" name="email" size="46"></td> </tr> <tr> <td width="87" valign="top"> <p align="right"><b><br>Message:</b> </td> <td><textarea name="message" rows="8" cols="58"></textarea></td> </tr> <tr> <td width="87"> </td> <td><input type="submit" name="submit" value="submit"></td> </tr> </table> </body> </html>
Support Functions and Initialization
There are a few global support functions and initialization steps, some of which don't need any real explanation. But, we'll make some comments on others; this is a tutorial after all.
Test Mode
For testing purposes, we often run the script locally using REBOL/View to make sure that it works properly. Whey it is run locally, the normal CGI environment does not exist. In order to detect that we use this test:
; If not in CGI environment, set Test-Mode.
test-mode: not system/options/cgi/request-method
In test-mode, the output is written to a file and browsed locally, because there is no browser waiting to receive it.
Setting Binary Number Base
Setting system/options/binary-base sets the number base for binary values used by the script.
system/options/binary-base: 64
This provides an easy way to let REBOL do some work for us throughout the rest of the script. You can see the effect of it by setting it to different values in the console and looking at the results. For example:
>> system/options/binary-base
== 16

>> to binary! "Testing, 1...2...3"
== #{54657374696E672C20312E2E2E322E2E2E33}

>> system/options/binary-base: 64
== 64

>> to binary! "Testing, 1...2...3"
== 64#{VGVzdGluZywgMS4uLjIuLi4z}

>> system/options/binary-base: 2
== 2

>> to binary! "Testing, 1...2...3"
== 2#{
0101010001100101011100110111010001101001011011100110011100101100
00100000001100010010111000101110001011100011001000101110001...
See the REBOL FAQ page for more details, but we use base 64 in this script.
HTML Output Buffer
The emit function is going to be used a lot in this script. It's the function that appends data to the buffer we'll eventually return to the browser.
The buffer itself is just a global string. Before you start screaming about using a global for something like this, understand that REBOL scripts are often very small and are designed with simplicity in mind. Every little thing you can simplify helps. The more complex a script becomes the more you need tools like encapsulation (e.g. objects); complexity breeds complexity.
The HTML output code is this simple:
html: make string! 5000
emit: func [data] [append repend html data newline]
See the other CGI tutorials for a complete description of this method.
The HREF Hyperlink Function
The href function is a very simple wrapper function that makes it easier to generate a href tags. If you do a lot of work with HTML or XML, you'll want to get to know build-tag; and if you don't like exactly how it works, you can tweak it. It is a mezzanine function so you can modify its source code.
href: func [data] [build-tag [a href (reduce data)]]
Encoding HTML
The encode-html function should be self-explanatory. In this tutorial it is only used to encode the source code for display in the web browser. It is not used for messages themselves.
The only thing to note if you're new to REBOL is how foreach is used here. Multiple words are set on each pass by putting them in a block; the values in the series are used in "groups" that match the number of words used (two in this case).
encode-html: func [
"Make HTML tags into HTML viewable escapes (for posting code)"
text
][
foreach [from to] ["&" "&" "<" "<" ">" ">"] [
replace/all text from to
]
]
If this isn't clear to you, try the following in a REBOL console session.
foreach [from to] ["&" "&" "<" "<" ">" ">"] [
print [from to]
]
Formatting the Date
The nice-date function should also be clear, thanks to the embedded help string in the function spec.
nice-date: func [
    "Convert date/time to a friendly format."
    date [date!]
    /local n day time diff
][
    n: now
    time: date/time
    diff: n/date - date/date
    if not day: any [
        if diff < 2 [
            time: difference n date
            time/3: 0
            return reform [time "hrs ago"]
        ]
        if diff < 7 [pick system/locale/days date/weekday]
    ][
        day: form date/date
        if n/date/year = date/date/year [clear find/last day #"-"]
    ]
    join day [<br> time " ET"]
]
This function makes heavy use of refinements, which is an important concept in REBOL. If you've used another object-oriented language, you may be familiar with "dot notation", which is commonly used to access properties in an object; refinements provide the same function for objects in REBOL, but they are also used on other native REBOL datatypes (e.g. date! values) that have "properties" you can access.
In nice-date there is a parameter called date which is a date! value. Date! values in REBOL can contain both a date and time component; to get just the date component, you use the /date refinement on them. Since the parameter in this example is called date, you end up with date/date to get just the date part of the argument.
Refinements also work on blocks, and you can specify an index or a word in many cases; e.g. time/3 above works the same as time/second since seconds are the third element in a time! value. Refinements can be applied in sequence (date/date/year) to access sub elements; it doesn't matter whether those items are native values, series values, or objects. The standard REBOL path notation works transparently across datatypes.
Refinements are also used in function specs, to define optional switches or parameters and, as if that weren't enough, refinements are also a datatype themselves; they are values you can work with, just like word!, string!, tag!, and other values.
Reading CGI Input
The read-cgi function is a handy because it lets the rest of the code remain ignorant about whether a CGI GET or CGI POST method was used.
read-cgi: func [
    "Read CGI data. Return data as string or NONE."
    /limit size "Limit to this number of bytes"
    /local data buffer
][
    if none? limit [size: 300000]
    switch system/options/cgi/request-method [
        "POST" [
            data: make string! 1020
            buffer: make string! 16380
            while [positive? read-io system/ports/input buffer 16380][
                append data buffer
                clear buffer
                if (length? data) > size [
                    print ["aborted - posting is too long:"
                        length? data "limit:" size]
                    quit
                ]
            ]
        ]
        "GET" [data: system/options/cgi/query-string]
    ]
    data
]
Notice that this function also allows you to limit the size of the incoming data. This can be used to prevent someone from posting a 10MB message, etc.
HTML Body Content Extractor
The read-body function is used to extract the body of any HTML file so it can be embedded in other pages. In RBBS it is used for the message input form.
read-body: func [
    "Extract the body contents of an HTML file."
    html [file!]
][
    html: read html
    remove/part html find/tail find html "<BODY" ">"
    clear find html </BODY>
    html
]
Web Page Output
The show-page function merges the data generated by the various commands with the HTML template file and returns the result to the browser. It even supports a test mode, for easy testing during development. In test mode it writes the data to a temporary file and opens the browser to view that file. (REBOL/View is required on your local computer for that to work.)
show-page: func [
    "Merge template with title and contents, and output it."
    title    ; page title
    content  ; page contents
    /local template
][
    template: read config/html-template
    replace/all template "$title" title
    replace/all template "$date" now/date
    replace/all template "$version" system/script/header/version
    replace template "$content" content
    either test-mode [
        write %temp-page.html template
        browse %temp-page.html
        halt
    ][
        print template
        quit
    ]
]
Error Output
Show-error is just a small wrapper that returns a slightly modified result, adding a note that something went wrong. It uses show-page to do most of the work.
show-error: func [
    "Tell user about an error."
    block "Block to be formed."
][
    show-page "An Error Occurred..." reform block
]
Small wrapper functions like this help simplify code in many cases (look at functions like remold, reform, and others to see how many REBOL's design included and see how often they are used by others).
Removing Unwanted HTML Tags
Filter-text is a function that allows basic HTML tags to pass through, but strips others. This reduces the opportunity for malicious code to sneak in, but still allows people to mark up their messages to some extent. It uses the tags-allowed setting the configuration to determine what tags can pass through.
filter-tags: func [
    "Filter HTML to only allow specific tags."
    page [string!]
    /local block extended
][
    block: load/markup page
    extended: make block! length? block
    foreach tag config/tags-allowed [
        append extended append to-string tag " "
    ]
    remove-each item block [
        if tag? item [
            not any [
                find config/tags-allowed item
                all [ ; allow </tag>
                    item/1 = slash
                    find config/tags-allowed next item
                ]
                foreach tag extended [
                    if find/match item tag [break/return true]
                ]
            ]
        ]
    ]
    to-string block
]
Web Form Output
Emit-form embeds the form in the HTML output for us, including a bit of logic based on whether the form is used on the main page of the message board, to add a new topic, or on a topic page to add a new message. Look at the HTML that is produced, or pull up a console, to see what this function does.
emit-form: func [
    "Emit the submission form (for both topics and messages)."
    topic-id [integer! none!] ; Use NONE to allow topic input
    /local text type
][
    text: read-body config/html-form
    type: 'topic
    if topic-id [
        ; Remove subject field from the form:
        remove/part find text <tr> find/tail text </tr>
        ; Add a hidden field for the topic id:
        append text build-tag [input type hidden name id value (topic-id)]
        type: 'msg
    ]
    emit [
        build-tag [form action (config/cgi-path) method post]
        build-tag [input type hidden name cmd value (type)]
        text
        </form>
    ]
]
Topic (Thread) Functions
Each topic is given a unique ID number to identify it. The actual messages for a topic are stored in a file named with that id number. A master topics.db file holds the list of topics as a block of blocks. Each block in that file has the format:
[topic id create-date modified-date msg-count]
Each time a new topic is created, it is added to the topics file. Each time a message is added, the topics file is updated to show the new modified-date and msg-count.
Generating a Topic Id Number
When a new topic is added, we generate a unique ID for it. We do this simply by incrementing a counter stored in a file.
next-topic-id: func [
    "Create next topic id #"
    /local n
][
    save %id.r n: 1 + any [attempt [load config/topic-id] 0]
    n
]
Loading and Saving Topics
The list of topics -- a mini-database if you will -- is stored in loadable REBOL format, so access is easy.
load-topics: does [any [attempt [load/all config/topic-db] []]]
Saving the topic database is also easy since we are using REBOL's native format for the data.
save-topics: func [data] [write config/topic-db mold/only data]
Adding a New Topic
To add a new topic, we only need a new subject line, which doesn't have to be unique (the ID we generate above is our unique identifier). The block of information for the new topic is appended to the topics file as a new line of data.
The newly generated ID is returned from the add-topic function.
add-topic: func [
    {Add a new topic. Store it in topic file. Return id.}
    topic
][
    id: next-topic-id
    write/append config/topic-db
        append remold [topic id now now 0 ""] newline
    id
]
An important function used in add-topic is remold which combines the native reduce and mold functions for easier use. The thing to note about mold is what the help for it says: "Converts a value to a REBOL-readable string." The key words there are REBOL-readable. form also converts values to strings, but the two produce difference results. If you aren't familiar with them, take some time to play around in the console and see how they work, and how they differ, given various datatypes.
Searching For Topic in the Database
Must-find-topic will find a topic (by ID number) in the topic database or show the error in the output that the topic couldn't be found.
must-find-topic: func [
    "Return topic record or show an error"
    topic-id
][
    foreach topic load-topics [
        if topic/2 = topic-id [return topic]
    ]
    show-error "Invalid message topic. Contact the administrator."
]
Updating the Topic Database
Update-topic updates the information stored in the main topic list when a new message is posted for that topic. Remember, a topic record looks like this:
[topic id create-date modified-date msg-count]
In the function you'll see path notation used to access those fields by number in order to update them. Once the topic is updated the entire topic list is sorted (in reverse, by their modification date) and saved to disk.
update-topic: func [
    "Update message status for topic"
    topic-id
    count "number of messages"
    name "last message from"
    /local topics
][
    topics: load-topics
    foreach topic topics [
        if topic/2 = topic-id [
            topic/4: now
            topic/5: count
            if not topic/6 [append topic none]
            topic/6: name
            sort/reverse/compare topics 4
            save-topics topics
            exit
        ]
    ]
]
Linking to a Topic
Link-topic is a small, but mighty, function. It uses the config information about where the CGI script lives, so it can generate a link to invoke it; it also allows an optional "bookmark" to be specified with a refinement, and then calls href to generate the a href tag for the link. It is used by emit-topics and list-messages.
link-topic: func [
    "Create an HREF link to a message topic"
    topic-id
    /bookmark name
    /local path
][
    path: join config/cgi-path ["?cmd=msgs&id=" topic-id "&"]
    if bookmark [repend path [#"#" name]]
    href path
]
Building the Topic Summary Page
Emit-topics generates an HTML table, putting the output in the global HTML buffer that will be returned from the CGI process.
emit-topics: func [
    "Generate listing of all topics"
][
    emit {
        <table border=0 width="100%" cellpadding=4 cellspacing=1
            bgcolor=silver>
        <tr bgcolor=maroon>
        <td align=center><font color=white><b>Msgs</b></font></td>
        <td width=80%><font color=white><b>Topic</b></font></td>
        <td align=right nowrap><font color=white>
        <b>Last Posting</b>
        </font></td>
        <td><font color=white><b>From</b></font></td>
        </tr>
    }
    foreach topic load-topics [
        emit [
            <tr bgcolor=white>
            <td><p align=center> topic/5 </p></td>
            <td width=80%> link-topic topic/2 <b> topic/1 </b></a></td>
            <td align=right nowrap> nice-date topic/4 </td>
            <td> topic/6 </td>
            </tr>
        ]
    ]
    emit </table>
]
Something to note here is how REBOL's tag! datatype makes it very easy to generate markup; you don't need to constantly escape to and from language strings, just type tags like you would normally would and REBOL recognizes them.
Message Functions
There are a lot of parallels between the topic and message functions.
Each message file is stored under the topic id number for it. Message records have the format:
[name email date message]
The message is stored as binary to avoid any possible problems related to delimiting it as a REBOL value.
Loading and Saving Messages
Once again, because we are using REBOL's native format to store data, loading it into a block for use by scripts is very easy. There isn't much to say about these functions, because they parallel the topic functions very closely.
load-messages: func [
    "Load messages for a specific topic."
    topic-id
][
    any [attempt [load/all config/msg-dir/:topic-id] []]
]

save-messages: func [
    "Save messages for a specific topic."
    topic-id
    messages
][
    write config/msg-dir/:topic-id mold/only messages
]
Adding a New Message
New messages are added by simply appending them to the end of the message file for the topic. This method is used (write/append) so that we don't have to read in all the prior messages in order to write out the new message.
add-message: func [
    {Add a new message.}
    topic-id
    name
    email
    message
][
    write/append config/msg-dir/:topic-id append
        remold [name email now to-binary message] newline
]
Because this tutorial does not use file locks when it modifies files, it is possible that two separate users who happen to post messages at exactly the same time could collide when the message file is being updated. To make that less likely to happen (but there is still a small chance) this write/append method is helpful.
Purging Old Messages
Purge-messages is a new one, with no counterpart in the set of topic-related functions. It uses two config values to determine how many messages it takes to trigger a purge and how old the messages must be in order to be purged.
purge-messages: func [
    "If message limit is exceeded, purge older messages."
    msgs
    /local today
][
    if (length? msgs) > config/max-msgs [
        today: now
        remove-each msg msgs [
            msg/3/date + confg/max-days < today
        ]
        save-messages topic-id msgs
    ]
]
Note how refinements are used to get the date of the message (msg/3/date). The message itself is a block, so msg/3 gets the third item in the block, which is a date! value. Since we only want to check the date part, and not the time, the /date refinement is added.
Note the use of parenthesis in the following line:
if (length? msgs) > config/max-msgs [
REBOL evaluates left-to-right, but infix operators take precedence over function calls, so, without the parens it would be evaluated like this:
if length? (msgs > config/max-msgs) [
which would give us an error by trying to compare a block to a number. If we flip things around, we can eliminate the parens because REBOL has to evaluate the function to get the second operand for the < operator.
if config/max-msgs < length? msgs [
Choose the approach that you think is clearest in these situations; there isn't always a single "right" way to do things.
Hiding Email Addresses
Obscure-email is a basic function used to mask email addresses to prevent them being easily harvested, but still allow them to display in the browser. Notice that we're replacing a char! value with a tag! value; the replace function supports this and operates not only on string values, but any series! value. replace is also a mezzanine function, so you can use source on it to see how it works.
obscure-email: func [
    "Make email more difficult for harvesters"
    email
][
    either any-string? email [replace email #"@" <br>][""]
]
Generating a Message Listing
Emit-messages parallels emit-topics.
emit-messages: func [
    "Generate listing of messages"
    msgs "block of messages"
][
    emit {
        <table border=0 width="100%" cellpadding=3 cellspacing=1
            bgcolor=silver>
        <tr bgcolor=navy>
        <td><font color=white><b>Sender</b></font></td>
        <td width=80%><font color=white><b>Message</b></font></td>
        <td align=right nowrap><font color=white>
        <b>When Sent</b>
        </font></td>
        </tr>
    }
    foreach msg msgs [
        emit [
            <tr bgcolor=white>
                <td nowrap><b> msg/1 </b><br>
                    <i> obscure-email msg/2 <i>
                </td>
                <td width=80%> to-string msg/4 </td>
                <td align=right nowrap> nice-date msg/3 </td>
            </tr>
        ]
    ]
    emit </table>
]
Building the Message Output Page
The list-messages builds the main message page for a topic. It includes a few links at the top, followed by a table of all the messages.
Since this code must deal with all the messages, it also takes the opportunity to purge any older messages. Doing it this way avoids needing to load all the messages a second time for the purge operation, so it saves some computation time.
list-messages: func [
    "Emit message list with form. Return title."
    topic-id
    /update "Update message count"
    /local rec
][
    rec: must-find-topic topic-id
    emit [
        <b>
        href config/cgi-path "Return to Topics" </a> " | "
        href #end "Go to End" </a> " | "
        link-topic topic-id "Refresh" </a>
        </b><p>
    ]
    msgs: load-messages topic-id
    if all [update not empty? msgs] [
        purge-messages msgs
        update-topic topic-id length? msgs first last msgs
    ]
    if config/msg-order = 'new-first [msgs: head reverse msgs]
    emit-messages msgs
    emit [
        <p><b>
        href config/cgi-path "Return to Topics" </a> " | "
        link-topic/bookmark topic-id "end" "Refresh" </a>
        </b><p>
    ]
    emit {<h2 id=end>Add a Message:</h2>}
    emit-form topic-id
    reform ["Messages for:" rec/1]
]
The Main Program
The main program for the message board is responsible for reading the CGI request (whether a GET or a POST), decoding it, filtering out unwanted data, validating required fields (and returning errors to display if something fails), dispatching the command, and returning the output from the command.
Read the CGI Request
Read CGI request and convert it to a standard object. The CGI request may have been passed using GET or POST, you really don't care. This method will handle both cases.
Once we have the CGI request during we convert it to a REBOL block which is then passed to the construct function which safely converts it into an object.
if not cgi: read-cgi [quit]
cgi: construct/with decode-cgi cgi context [
    cmd: id: name: email: subject: message: none
]
Never use the make object! or context functions to convert a CGI block into an object. Those functions allow code to be evaluated, which would be unsafe. Use the construct function instead. It does not evaluate its fields.
Filter HTML Tags
Filter out restricted HTML tags from being submitted to any field.
foreach word next first cgi [
    val: get in cgi word
    if string? val [set in cgi word filter-tags val]
]
Convert CGI Fields
Convert CGI fields as needed. For example, the CGI command is converted from a string to a word. (For small programs like this tutorial, this action is not really needed. The command could stay a string. However, in general words are more efficient than strings.)
cgi/cmd: attempt [to-word cgi/cmd]
cgi/id: attempt [to-integer cgi/id]
if not email? cgi/email: attempt [load cgi/email] [cgi/email: none]
The check-fields function defined below will be used to verify that all required fields have been provided within the web form.
check-fields: func [/subject][
    if all [subject empty? trim cgi/message] [
        show-error "Subject required"
    ]
    if empty? trim cgi/name [show-error "Name field required"]
    if empty? trim cgi/message [show-error "Message is required"]
]
Process the CGI Command
This code processes the CGI command and shows the final output page.
The CGI command comes from an input field within the web form or from the link URL itself. Here it is just a word.
switch/default cgi/cmd [
    msgs [
        title: list-messages cgi/id
    ]
    msg [
        check-fields
        rec: must-find-topic cgi/id
        add-message cgi/id cgi/name cgi/email cgi/message
        title: list-messages/update cgi/id
    ]
    topic [
        check-fields/subject
        id: add-topic cgi/subject
        add-message id cgi/name cgi/email cgi/message
        title: list-messages/update id
    ]
    source [
        title: "REBOL Message Board Source"
        emit [
            <h2> "REBOL Code" </h2>
            <pre> detab encode-html read %test.r </pre>
            <h2> "HTML Form Code (form.html)" </h2>
            <pre> detab encode-html read %form.html </pre>
            <h2> "HTML Template Code (template.html)" </h2>
            <pre> detab encode-html read %template.html </pre>
        ]
    ]
][
    title: config/title
    emit-topics
    emit {<h2>Add a New Topic:</h2>}
    emit-form none
]

show-page title html
Conclusion
We hope that you have found this tutorial helpful as an example of a more detailed web CGI application.
REBOL provides an elegant way to create a wide range of CGI applications. Scripts created with REBOL tend to be more readable, making them easier to maintain and modify over the years.
But, REBOL is useful for more than just CGI scripts. REBOL includes many other powerful features including its own graphical user interface. You should find that many of the programming techniques used within this tutorial will help you in writing other types of REBOL programs.