How To Create Subpanels
Revised: 1-Feb-2010
Original: 1-May-2001
Return to: REBOL How To
Contents
How to run the examples
To run any of the examples that are shown below, open a text editor and create a REBOL header line such as:
REBOL [Title: "Example"]
Then simply cut the example text and paste it after this line. Save the text file and give it a name, such as example.r. Then run the file just as you would run any REBOL file.
Creating the main window
Here's how to create subpanels that can be rapidly switched from within the same window.
In the top level (the window) layout, specify the area of the window that will hold the subpanels. This can be done with a VID style such as BOX.
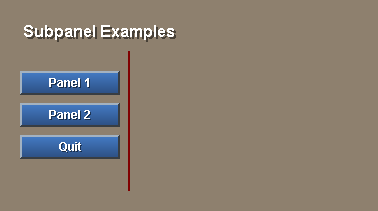
Here is an example of the top level layout. A BOX of size 240x200 is specified to hold the subpanels and two buttons are defined to switch between the panels.
main: layout [
    vh2 "Subpanel Examples"
    guide
    pad 20
    button "Panel 1" [panels/pane: panel1  show panels]
    button "Panel 2" [panels/pane: panel2  show panels]
    button "Quit" [quit]
    return
    box 2x140 maroon
    return
    panels: box 220x140
]
This will appear as:
The panels word will refer to the box, and it is used by the buttons to switch its contents. The button actions will be described later.
For debugging you may want to know see the location for the subpanels, you can use this handy trick. Set the box color while debugging. For example, the panel box color is set to navy blue below.
main: layout [
    vh2 "Subpanel Examples"
    guide
    pad 20
    button "Panel 1" [panels/pane: panel1  show panels]
    button "Panel 2" [panels/pane: panel2  show panels]
    button "Quit" [quit]
    return
    box 2x140 maroon
    return
    panels: box 220x140 coal
]
This will appear as:

Creating the subpanels
Now, you can create subpanels to be shown in the window. You can have any number of subpanels within the BOX area, and those subpanels can include any of the capabilities of REBOL/View, such as images, animations, lists, or even other subpanels.
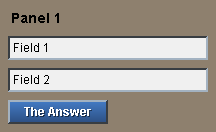
The first subpanel has a title, two fields, and a button.
panel1: layout [
    origin 8x8
    h3 "Panel 1"
    field "Field 1"
    field "Field 2"
    button "The Answer" [alert "I know nothing."]
]
It will appear as:
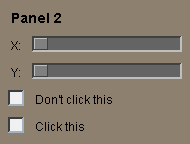
The second subpanel contains a couple sliders and checkboxes. The check boxes will change the color of the subpanel backdrop.
panel2: layout [
    origin 8x8
    h3 "Panel 2"
    across
    txt "X:"
    slider 150x16
    return
    txt "Y:"
    slider 150x16
    return
    check [panel2/color: maroon  show panel2]
    txt "Don't click this"
    return
    check [panel2/color: silver  show panel2]
    txt "Click this"
    return
]
It will appear as:
Assembling and running it
The examples above are assembled here into a single program that you can cut and paste into your text editor.
REBOL [Title: "Subpanels"]

main: layout [
    vh2 "Subpanel Examples"
    guide
    pad 20
    button "Panel 1" [panels/pane: panel1  show panels]
    button "Panel 2" [panels/pane: panel2  show panels]
    button "Quit" [quit]
    return
    box 2x140 maroon
    return
    panels: box 220x140
]

panel1: layout [
    origin 8x8
    h2 "Panel 1"
    field "Field 1"
    field "Field 2"
    button "The Answer" [alert "I know nothing."]
]

panel2: layout [
    origin 8x8
    h2 "Panel 2"
    across
    txt "X:"
    slider 150x16
    return
    txt "Y:"
    slider 150x16
    return
    check [panel2/color: maroon  show panel2]
    txt "Don't click this"
    return
    check [panel2/color: silver  show panel2]
    txt "Click this"
    return
]

panel1/offset: 0x0
panel2/offset: 0x0

panels/pane: panel1

view main
The panel offsets are set to 0x0 to reduce the space that they require.
The second to last line sets the initial panel to panel1. If this is not done, then no initial panel will be shown.
To change the panel, the button actions change the pane for the BOX, then refresh the BOX with the SHOW function.
You can extend this example and add multiple panels by adding multiple BOX styles to your main layout and defining additional subpanels.